Saturday, October 26, 2013

Playful Kitten Chair

Happy  Fall!  The trees are turning and dropping their leaves, and there is a crispness in the air that makes me miss going to my son's high school football games.  I still have some outdoor work to get done before old man winter dumps snow on us. I try to get a lot of my sanding of furniture done before it gets too cold, because I do that in the garage and it is not heated. Are you trying to get some of your projects done before the first cold snap?  

What do you think of this little beauty? I had this in my garage for way too long, because I didn't quite know how I was going to get it sanded down enough to make the paint stick. There were so many details on it, and the finish was all cracked and flaking.


Ever wonder what something looked like when I first started it? Here it is in all it's shining glory. This was for a client of mine, and had belonged to her husband's uncle, so it had sentimental value. It was all flaking and powdery when I got it. I used a wire brush to get most of the flakes out of all the crevices.


You can see there were a LOT of crevices!  Still it had beautiful lines, and I knew it could be something special. The seat was really bad.  Judy said " just paint over it, because I don't know what else you can do to it when the wood is so cracked and raised like it is". Of course my mind was already turning on possibilities to cover up seat. 


The legs just chipped off when I tried to sand them, so I got most of the loose finish off with my wire brush and started sanding by hand. Man, it was looking pretty sad, and I actually put it away for a long time before tackling it again. (yes, chicken is a word that comes to mind) I am always afraid I will do it wrong when it is a commission piece! When I do pieces and then just sell them, I don't have to worry about the process I go through to get to the finished product.  I might change my mind mid project and come out with a completely different piece than I first had in mind, because I don't have to please every one...just the one person that can't live without it... .but on a commission piece, you have only one person to please to start with, and that is the only chance you get to please someone. Does that make sense?I have yet to have a dissatisfied customer that I know of, but it always makes me nervous. (Yes I know...I always tell you it is  JUST PAINT, and you can do it over if you don't like it! LOL)


I started with the base coat, and I used chalk paint because I thought I would distress it  some. (I didn't in the end but I still like the soft look . ) Chalk paint seems to come in earthy soft colors that blend with just about everything. The Chalk paint is designed for painting furniture and distressing it. It also sticks without primer and I wanted something that would bond good and be a little thicker paint for this piece. 

First I did a green base.


Next I did the light turquoise accents


  Then did a very light brushing of the red in the crevices. After I do the shading in the crevices (like the red in this picture) I usually have to go back over the piece several time with the other colors until I get just the right contrast that I want. ...For instance, I put more green back into the detail so that so much red didn't show, or  have a distinct line where the red ended. Same goes for the turquoise. 

Next came the details, and of course this is where the I just get lost with my little polka dots and stripes. :) When you are doing a piece, try to tie the colors together so that when the eye sweeps over the whole piece you catch colors on the way down that repeat. Like the red for instance. I have it as accent on top, then the spindles are more solid, then just in accents on the bottom rungs. 


?????????????????????????
Translated: What the heck am I going to do with that seat????


Even with paint on it, the seat is very rough. The top layer would crack and probably give you a splinter eventually (OUCH!), so I had an idea.


 I have canvas that is heavier and preprimed , I use it for floor cloths so it is very durable. 
So I painted this picture on it. (I knew that they loved cats)


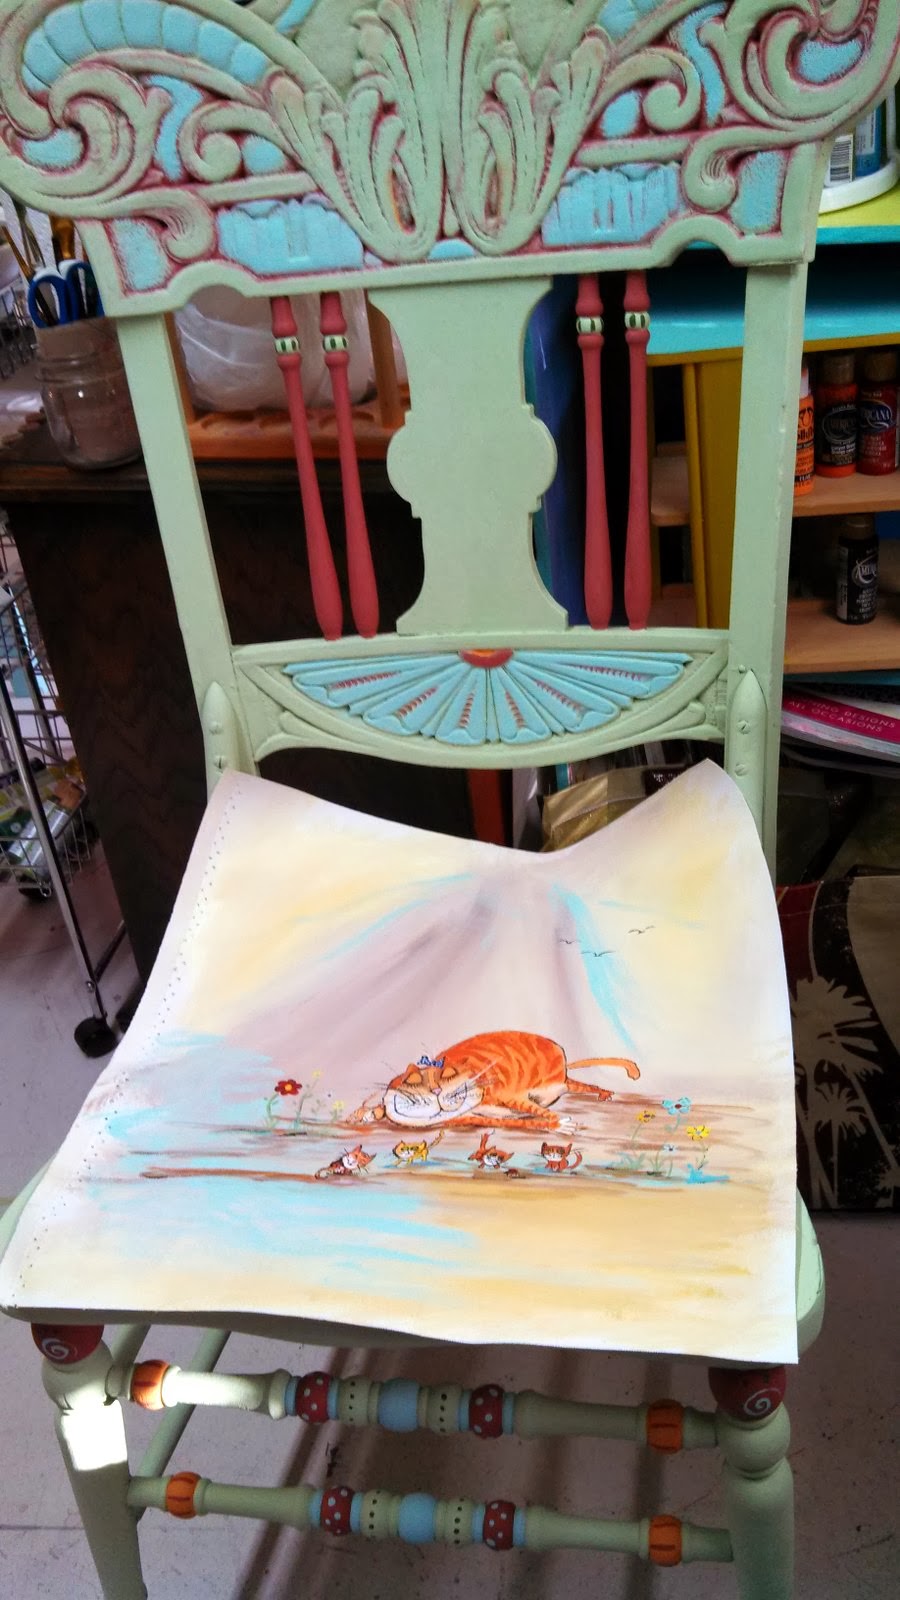
Cut it and a piece of batting  to the size I wanted. (Cut the batting about 1/2 inch smaller than the canvas. ) To make the painting  fit, I first did a pattern out of paper, folded in half so that it would be identical in shape on each side. I then centered the pattern over the painting, placed the batting underneath,


Tacked it down with upholstery tacks, and no splinters today!


Previously before I tacked the painting down, I put 4 coats of polyacrylic on the chair, I also put 3 coats of flexible artist varnish on the  painting before I cut it out. This will allow clean up with a damp cloth without damaging the painting.

 
Do you have an old chair sitting around just waiting for you to breathe new life into it? It doesn't have to be fancy, just a solid color changes the look  so much. I am going to paint some kitchen chairs for my kitchen is solid sherbet colors.  I haven't decided on the table top yet but when I do, I am sure you will see it here!
 
I hope you are having a wonderful life, and if you are not....what can you do to change it? This is it, there are no dress rehearsals, we don't get to have a "do over".  My email is csoconnor1@gmail.com, if anyone is having problems that seem too great for them, please feel free to contact me. Sometimes it is easier to talk to a stranger than it is to someone you know. Not saying I can fix anything, but I have been accused of being a good listener. Until next time,  take care, Carolyn
 
I want to leave you with this:
 
THOUGHT FOR THE DAY
                                                This is the beginning of a new day.
                                                God has given me this day to use as I will.
                                                 I can waste it or use it for good.
 
                                               What I do today is important,
                                               Because I am exchanging a day of my life for it.
                                               When tomorrow comes, this day will be gone forever, 
                                               leaving in it's place something that I have traded for it.
 
                                               I want it to be gain, not loss;
                                              good, not evil;
                                              success, not failure;
                                              so that I shall not regret the price I paid for it.


Saturday, September 7, 2013

Alaska art


I'm back from my Alaskan trip, and it is bittersweet. Of course I am happy to be home but I also miss the pitterpatter of little feet from my grand children. It was such a fun time and I am lucky I was able to spend as much time with them as I did. I was gone 7 weeks. That is a long time. I missed my studio!
I did have a chance to do some art while I was there, and do some art with the kids. First I am posting one of favorite projects and one of my first projects when I started painting furniture.


This is a bench my son made and then I painted it about 8 years ago. I don't know if I even used primer on it. I used craft paints, Deco, Folkart, and Americana probably. I did put 3 coats of poly on it and I am amazed at how well it has held up. It takes a lot of abuse and still looks great.


I used a gold paint pen to outline the backgrounds....probably because I had one! Sometimes I just want to use a special pen or a color, luckily it looked OK in this case...


Below is a canvas door hanger. I just took a piece of primed canvas, you can get at an art store. Mine was on a roll that I bought to make a floorcloth with.  If it is not primed, you will need to tack it down to a board and then prime it. It will buckle up if you don't tack it down. This actually stayed nice and flat since it was already primed, and I just used craft paints, because that is all I had up in Alaska!  I use craft paints a lot on canvas here in my studio also, but I like to use my artist paints along with them (acrylics) because they are so much more brilliant and saturated with color which really brightens the picture up. You can't see it in the picture, but I have folded the top over and made a little sleeve which I slipped a dowel into.

The round dowel can be found at pretty much any home improvement store. I then tied a narrow ribbon from end to end on the dowel and that is what it hangs on.


 I will post more soon of a couple of other projects I completed while I was there. Thanks for visiting my blog and I welcome any comments or questions. If you want to receive an email alert when I post something new, sign up for the email notification on the right side of the blog. 
 Remember,  "Every day is a canvas, paint your life with bold and brilliant colors."
  Ta ta for now.Carolyn

Sunday, July 28, 2013

Flower Murals


Hello from Alaska! I am visiting my son and his family in Alaska for an extended stay. I uploaded my pictures so I could finish this post after I arrived.  I wanted to show you what I did to get ready to go.... I have a great nephew Trace, for whom I painted a mural a couple of years ago with the help of his Mother, grandmother and aunt. I promised to paint his sisters ....my twin great nieces.... room and I just had to finish it before I left. 

They wanted flowers, lots of flowers and you know what? They were in luck because I LOVE to do flowers! Funky Flowers. It was so much fun. Kim, their mother, and their Auntie Melissa helped. Here I am just getting started on the butterfly part on Kassidy's wall.


So I did these flowers,  and it was interesting. I maybe should have done them alike, because  I had the flowers in the above picture finished when I left the first time but didn't get  done with the below picture, which is Berkley's. (No butterflies or dragonflies were there at the time on either wall when I left their house the first time.) 


I did the flowers in the first picture a little bigger, but did more smaller flowers in the picture just above this.. I did not have the butterflies done, but was coming back to do them. I still had more shading to do on this second set but there were 7 flowers. This picture below was on Kassidy's wall, and had 5 flowers but were bigger.  SO,... Berkley had 7 flowers and Kassidy had 5......but Berkley for some reason thought Kassidy had more flowers, probably because they were bigger and the shading gave them more life. After I left, Kim (their mother) said Berkley started crying because she said Kassidy had more flowers. Kim consoled her and told her that she didn't, actually she had more than Kassidy, and besides, Aunt Carolyn could put another flower on when I came back. So all was well, she put them to bed and then through the crack in the door she heard Kassidy say, " I think I DO have more flowers than you Berkley!" to which Berkley began wailing again!  They are 3 years old, their brother Trace is 7 years old and there is never a dull moment. 

Above is the finished picture on Kassidy's wall.

 
This is Berkleys finished wall.


The first thing I do is draw the flowers on the wall. I did these freehand, but you could also use a transfer. I like to draw with a watercolor pencil, because when you paint, it just kind of blends in  and dissolves. If you draw it in pencil, and you make a mistake.... sometimes it won't erase and it also leaves a spot on the paint where you erased it.  Also, the pencil is hard to cover. I usually draw the stems on as I paint, and then foliage is last.  Butter flies and dragonflies are always a big hit with little girls. I am partial to the dragonflies myself.

Once I get the drawings done, I just start filling in, kind of like coloring. After the base color is on, I starts shading. To learn how to shade, start looking at a small part of a painting you like and see how many colors they used to make it look like it has depth. You will be surprised at the colors they use sometimes.


In a child's room, I try to think of something to hold their attention, and something that is on the level they will be looking, for instance, when they go to bed. I put bugs, ants, caterpillars and things like that on the leaves. I will probably do more bugs on this when I get back home. I just had time to put a couple of lady bugs on for them before I had to quit.


When you are looking at how far off the floor to make them, be sure to take into account how far up the bed will come if the bed is going to be pushed up against it.
 I almost got these too low.


And this is Kim trying to keep Kassidy from running away while I was trying to take her picture ....
And this is Berkley, happy with her flowers at last! She was so funny. She was doing a happy dance in the hallway when she saw the flowers, but of course I missed the shot. Still, she looks pretty happy.

I hope you enjoyed the pictures. My next post will be about my visit here in Alaska and probably be more of a scenic post as soon as I get my pictures downloaded.

If you have any questions about doing a mural, please email me at  csoconnor1@gmail.com and I will be happy to try and help.
If you haven't signed up to be notified by email when I post new things, please do. I love feed back, so let me know what you think of the murals! Thanks! Carolyn

Tuesday, June 4, 2013

Little Purple Half Moon Table

     Wow, What a beautiful day today! Here in Nebraska, if you can find a day without humidity, it is a great day! 
     This will be short but I wanted to get this posted before I say goodbye to the day.  I thought I would post a little half moon table that I painted with CeCe Caldwell's Chalk Paint. It was a lot of fun to do, and was one of my first projects with Chalk Paint. The Table was a garage sale table, very light weight. It cost next to nothing and had been sitting around my back room in the basement for a couple of years. 

 
     I like to do the knobby legs as you can probably tell if you have looked around my blog very much. I actually waxed the top, and then I decided to use poly on it instead of wax because I was afraid it would bleed into the next color if I waxed it. I also wanted the paint to be set before I started to Poly it, so I did what I always do to set the paint so it doesn't bleed...I took a can of spray Varathane Poly and sprayed it to set the colors....I had not done any spraying on chalk paint before and when I sprayed the Varatahane finsh on, it was like it melted the Chalk Paint!#@**&^% I was just sick. I thought I had ruined it for sure. But I also knew that if I stroked it on with a brush, the black and white stripes  would bleed together.    I had chosen not to wax it because I didn't want the wax rubbing off some of the color since I wasn't going to distress it. I left it for a while and just went upstairs to let it sit and dry good. When I went back down to look at it, it was like magic....it has all filled back in where the paint had looked like it melted off. I was a happy camper! I kinda liked the brightness of the colors.


I know the close up is a little fuzzy but I forgot to take my camera with me. I took this to the Newton, IA Home Show and it was the first to sell. Have you done a little half moon table? I would love to see pictures. I am no expert by any means, but if you have any questions about paint or applications, I would be glad to share what I know.  Have a great rest of the week, ta ta for now. Carolyn

Friday, May 24, 2013

Funky Vintage Telephone table

Happy Memorial Week End!  Here in Nebraska it looks like we are in for some thunderstorms this weekend. Of course, it's NE so we have to expect that. Day before yesterday, it was so cold I had to wear a jacket and long sleeved shirt when I went for my walk! Today I have been working in my office cleaning, and filing..ugh~ But tomorrow there will be some painting done by golly! Anybody wanna join me?
This project is,  I believe, a Vintage Telephone Table, anyway, that is what I have dubbed it and I'm stickin' to it....unless.....someone out there knows what this actually is! If you do, please leave a comment, OK?


I painted it with CeCe Caldwell's chalk paint for the base, and acrylic craft paints for the details. First I put on a coat of Pinkerton Violet, (actually my sister did the base coat for me) and then Spring Hill Green. . ....I know,..Violet??? But it was on sale and I thought it was close enough to just an off white, and you know what? It distressed perfectly. I think we will do my sisters benches the same way.


I always like to put funky knobs on my furniture to give a little element of surprise. Do you ever just take your current furniture and change the knobs to make it a little eclectic? You should try it. I have a wood piece in my entryway that I just haven't wanted to paint, and I put different knobs on it....yes, different ones on every drawer.. and it is pretty cool, well , in my book anyway. And since I am the one that has to live with it, that is the one that counts , right? :)

Here is a close up of the heart. I have had a lot of fun doing my funky hearts and people seem to look for them now. Each one turns out different.


OK, Now here is my messy studio area, and if you look in the back, there are my table legs drying on top of bottles! It is so much easier when they just screw off and I can paint them independently of the piece I am working on. They have a screw piece sticking out of the end so I can't set them down on a flat surface at all, but I can sure stand them up on bottles!


Well, looks like my hubby is wanting some attention, so this will be all for now. If you like my funky furniture, make sure  to sign up to follow me. That way you will get an email alert whenever I post something new.  Also, if you have a different idea of what this table was used for, I would love you to leave a comment!
Ta ta for now, have a fabulous weekend.  Remember, never put the key to your happiness in someone else's pocket!. Carolyn


Monday, May 13, 2013

Piano top Chest

 I think summer is here! Yea!!!!  Here's a fun little project, I found at a thrift shop. It was in great shape. The drawer wasn't closing right at all......so it was priced low...and you know what was wrong??? It was just off it's track! My good luck was working that day. Even the insides of the drawers were in perfect condition.   I painted a distressed look on the lower half, using CeCe Caldwell's paint. The top was done with acrylic paint because I can blend better for the shadings on the keys. Chalk paint is thicker so it is not as good for fine detail and blending.


I love to do Piano keys (you probably already know that if you have looked at all my blog), they intrigue me. I don't even play! My sister Mary Ann plays piano beautifully and I love to listen to the expression she puts into her music. I do however play guitar and sing. I played in a band for about 15 years and then did a singles act for another 10. Now I play with a group for Assisted Living Centers and such. I have actually written several songs, so music is in my blood.

If you look to the left of the picture, there is the leg from a chair I have on display also. These pieces can be found at Space Doctors Interiors,  209 5th street, in West Des Moines Iowa.


Any questions? I love to help  in any way I can. Just post here, or you can email me at csoconnor1@gmail.com.
I will be at ArtFest in West Des Moines Ia this Sunday, May !9th. It is in the Historical Valley Junction . I will be in front of Space Doctors Interiors doing some live demonstrations on my painting. Stop in and see me, I would love to visit with you! Ta ta for now, Carolyn


Thursday, April 11, 2013

Janet's Clock


I can't believe we had a snow and ice storm yesterday! For crying out loud, it's April! Last year it was so nice that the farmers were in the fields. I am headed for Des Moines tonight so I hope the roads clear off by late afternoon.

If you are in the Des Moines, IA area, stop into Space Doctors Interiors. Gayle has a wonderful fun store, and will be happy to show you some of my pieces that she is carrying in her store.  Actually, I will be there tomorrow night 4/12/13 for the Art Walk.
Space Doctors Interiors is located in Historical Valley Junction, 209 5th St.,West Des Moines, IA
This is a funky little clock I found in Denver at a thrift store. It had ugly black paint on it. I think it had been spray painted, so I sanded most of it off before I started. This was a fun one to do and I was pleased with the color combinations after I got done. I am always kinda iffy about half way through, and then it all comes together later. I always try to pick a focus color to carry through to the bottom. This time (and many times) it is red. See how the red is very subtle in the face of the clock, but it is in there, and then the red knob draws your eye down to the drawer. I like to put big funky knobs on for that pop of surprise.

 
 For the face, I did a base of light creamy yellow with a hint of orange and let it dry.Oh yeh....the first thing I did was take the hands and clock works off!  .....Next I  just kept swirling orange, and red together until I got the look I wanted, and then put some streaks of periwinkle and apple spice in with a dry brush. I like to blend my colors while they are wet, like in the little cubby hole...You can see the lavender is streaked. I paint one color first, the lavender, and then go back over it with lavender and a little white or really pale lavender and blend them while they are wet. You have to work fast or it will dry out and your brush will drag. If your paint is too dry to work with, you can add some blending gel, which is available at any craft store that carries the craft paints.
Be sure to sign up to be a follower of my blog, that way when I post new things you will be notified by email.
Happy painting to you, and of course if you need some ideas, just email me a picture of your piece and I will be happy to brainstorm with you. I am good at telling everyone else what to do! It is just my own pieces that I ponder on for hours. :) My email is csoconnor1@gmail.com and I would love to hear what projects you are working on.
Ta ta for now, Carolyn

Mary Ann's Curio

People are always asking where I get my pieces. The answer is everywhere! Most of my pieces come from garage sales and thrift stores. Although I have the most luck at garage sales for pricing, I don't pass up anything that looks like it might have some treasures buried there.
 
I was out checking out a few places in Lincoln, and I saw a drugstore/gift shop that was having a sidewalk sale. Usually I don't find anything so I was really excited when I found this great buy. This is a fun little curio that I was lucky enough to pick up for 5 bucks! It was in good shape because it was new, so I just sanded it all down and got ready to prime. I loved working on this. I actually took it all apart to paint the back panels because I hate trying to get my paint brush and hands into such tiny spots.......then when I put it back together, I hate how it never seems to go together as easy as it comes apart!  For example, I painted the door and was happy with it until I started to assemble it and discovered I had painted the door upside down! Oh well, I wasn't going to paint it over but it was really meant to have the gold and red strip along the top of the door. But you never would have known unless I told ya now, would ya?
 
 
I gave this to my sister Mary Ann for her birthday and she loved it. She is fun to show things to, because she always says "that is my favorite thing you have done!" Ha ha! She sure has a lot of favorite things! It is so good for my creative ego.  :)
I really liked the little knobs for the feet and the decorative pieces on top. They are fun to do I think.
What fun things have you been working on? I would love to see them, or if you want some ideas just email me your picture and I will brainstorm with you.  My email is csoconnor1@gmail.com.  I would really love to hear from you. Well, back to the ole drawing painting board. I am working on a clock today and will post pictures later.
 By the way, if you are in the Des Moines area, Stop into Space Doctors Interiors  located in the Historical Valley Junction, 209 5th St, West Des Moines, IA. I have several of my pieces there that I think you would enjoy. Ta ta for now! Carolyn

Thursday, January 24, 2013

HAPPY NEW YEAR

2013! A NEW BEGINNING!
Good grief! Where did the time go? Did you have a Merry Christmas and Happy New year? I am so thankful for all I have in my life and for this God given fascination with a paint brush!  Thought I would show you a little of what I have been up to.
HANGING JACKET THINGY (for lack of a better title)
 
This is a Jacket hanger that measures about 18 inches at the widest, and is about 9 inches tall. I say "about" because of course I forgot to measure it before I placed it in the gallery. I am such a procrastinator....in fact if you look in the dictionary under procrastination, my picture is by it! Do you have problems with that too?
This was another thrift store purchase and it was an ugly blue. It was so ugly that it hung in the storage room for 2 years before I decided to just see what it would look like in pretty colors. What do you think? After about 20 minutes into painting it, I thought, "Well this is kinda cool the way the colors brighten it up...hmmmm.. why didn't I just "start" before now?
LAZY SUSAN


This Lazy Susan was a purchase from IKEA a few years back. I saw them on sale and right away knew I could make something fun with it--so I bought several!
MUSIC LOVER LAZY SUSAN

This Lazy Susan was on it's way to my display area but never made it past the desk where my artist friend Kye was holding down the fort for First Friday Art Walk at Noyes Art Gallery! She said "oh my ...I think that needs to set right here!" So I planted left it on the desk by her for a while  to contemplate...and ya know...it never did make it to the display..instead it set by Kye all night with a sold sign on it because she had decided it needed to live in her home.  Kye has bought several of my pieces (Thank you Kye!) and does wonderful Mosaic work.


JANUARY DISPLAY


This is my January display at the gallery. A little sparse because several pieces were selling as I was trying to take pictures. What a good problem! I love to meet my customers, so it was a super fun night.
DESK ART (I bet you could do this!)

This is something that you could do with little of nothing. I take 2x4's or 2x6's, cut them in chunks like this and then decorate them with sayings. They are a fun way to have art on your desk that doesn't take up very much room. They make a great gift and are something personal that will make your Friend smile. You can do them with just one color background and then jazz up the letters. If you look on line or Pinterest, you can find fonts and wonderful sayings that will look good. I just write, and then start decorating. Believe me, I have the world's worst handwriting (next to my hubby's, tee hee) so if I can do this, you can too. If you need any tips, just leave me a comment and I will get back to you. I am always glad to share "how to"  information.
A FUNKY FUN CLOCK
 
 
This little clock was a fun one to do, and it sold right away. Clocks are always a big hit and never stay long after I put them out. If you see a clock at a garage sale or thrift store, snatch it up. You can put a new mechanism in it, and paint it up in fun colors to make a drab (most are just the blah brown when I get them) ho hum thing into a focal piece for your room.  
Well, that's all for today, hope you have a wonderful weekend. If you like what you see here, be sure to sign up to be a follower of my blog, and then when I post new things you will get an email notification. :)   Thanks for poking your head in!

"NEVER PUT THE KEY TO YOUR HAPPINESS IN SOMEONE ELSE'S POCKET"
Ta ta for now, Carolyn